CanDo® Back Stretcher Assembly Instructions
CanDo® Back Stretcher – 10-7900
Parts Supplied:
- (2) Black Side Rails
- (15) Curved Blue Bars
- (6) Hex Nuts
- (6) Screws
Required:
- (1) Phillips-Head Screwdriver
Instructions:
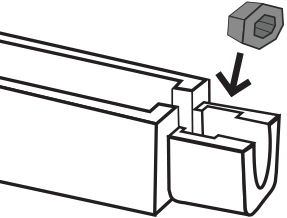
- Take 2 hex nuts and insert them on the inside of each end of a blue curved bar. Repeat this step 2 more times for two more blue curved bars.
- Take the first blue curved bar with the hex nuts inserted and insert that curved bar into the first notch hole on each black side rail. Make sure the two humps at the blue bar are facing up.
- Take 2 screws and screw them through the black side rail and blue curved bar, twisting into the inserted hex nuts.
- Insert blue curved bars without the hex nuts in-between the black side rails until you reach the next part of the black side rail with a hole cutout.
- Take the next blue curved bar with hex nuts inserted into each side and insert it in-between the black side rail notches that align with the hole cutout.
- Take 2 screws and screw them through the black side rail and blue curved bar, twisting into the inserted hex nut.
- Insert blue curved bars without the nuts in between the black side rails until there is only one curved blue bar left.
- Insert that last blue bar, that has hex nuts inserted into it, in-between the two black side rails, aligning with the hole cutouts on the black side rails.
- Take 2 screws and screw them through the black side rail and last blue curved bar, twisting into the inserted hex nut.
- Carefully read instructions for use included with product.